|

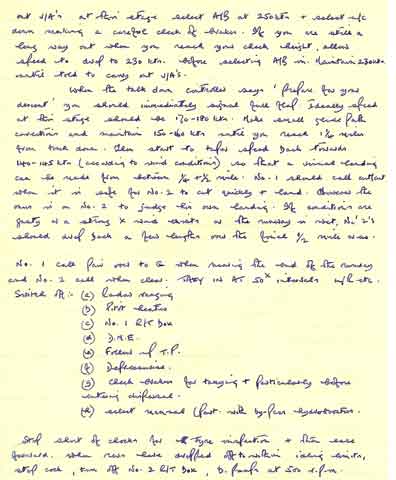
The above briefing notes were written by Paddy Hine when a Flight Commander
on 93 Sqn and Brian Butterworth kept Paddy's handwritten notes.
This particular brief was obviously given on the DFCS course
as the base is West Raynham. Paddy is leading and the other members
of the formation are all well known fighter pilots of the time who were
either course students or DFCS staff.
                ATTACK FORMATION (OFFENSIVE)

                                                                                                                                     Comments in red

     out V/A's at this stage select A/B at 250kts & select u/c                               V/As - Vital Actions before landing Click to see.
     down making a careful check of brakes.   If you are still a
     long way out when you reach your check height, allow
     speed to drop to 230 kts. before selecting A/B in.   Maintain 230 kts
     until told to carry out V/As.

              When the talk down controller says 'Prepare for your
     descent' you should immediately signal full flap.   Ideally speed
     at this stage should be 170-180 kts.   Make small glide path
     corrections and maintain 150-160 kts until you reach 1¼ niles
     from touch down.   Then start to taper speed back towards
     140-145 kts (according to wind conditions) so that a final landing
     can be made from between ¼ + ½ mile.   No.1 should call cut/cut
     when it is safe for No.2 to cut quickly & land.   However the
     onus is on No.2 to judge his own landing.   If conditions are
     gusty or a strong X wind exists or the runway is wet, No.2's
     should drop back a few lengths over the final ½ mile or so.

      No.1 call pair over to G when nearing the end of the runway
      and No.2 call when clear.   Taxy in at 50x intervals   flaps/R etc.       Retract flaps.
      Switch off:-  (a)  Radar ranging.
                            (b)  Pitot heater.
                            (c)  No.1 R/T box.
                            (d)  D.M.E.
                            (e)  Follow up T.P.
                            (f)  Depressurise.
                            (g)  Check brakes for taxying & particularly before
                             entering dispersal.
                            (h)  Select manual (Powr. with by-pass hydroboosters.

     Stop short of chocks for the tyre inspection + then ease                  One should stop about a quarter of a wheel turn so that the
                                                                                                                          groundcrew can examine the surface of the tyres which will
                                                                                                                          be hidden at the bottom when the wheels finally stop against
                                                                                                                          the chocks.
     forward.   When revs have dropped off to within idling limits,
     stop cock, turn off No.2 R/T box, b. pumps at 500 r.p.m.                 Booster pumps off.
End of Page 5.
(Thanks to Chris Stone for being the Technical Advisor for this series.)
|


